This page describes how to issue new eHerkenning credentials to users in your organization as administrator.
Login to the administrator portal can be done viaMy Reconi.
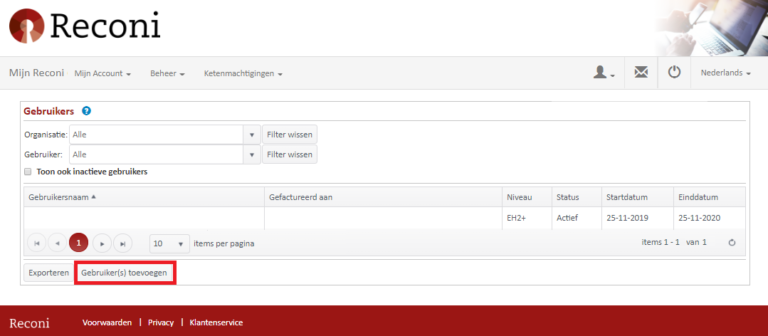
Step 1: Manage users
In our administrator portal, you will find the "Administration" option in the drop-down menu. Under the "Administration" section, choose the "Users" option.
Step 2: Add user(s)
Under "Administration" -> "Users" you will find an overview of all users per organization. On this page you have the possibility to filter and export overviews of users for which you are authorization manager .
You also have the option of adding user(s) via the "Add User(s)" button.
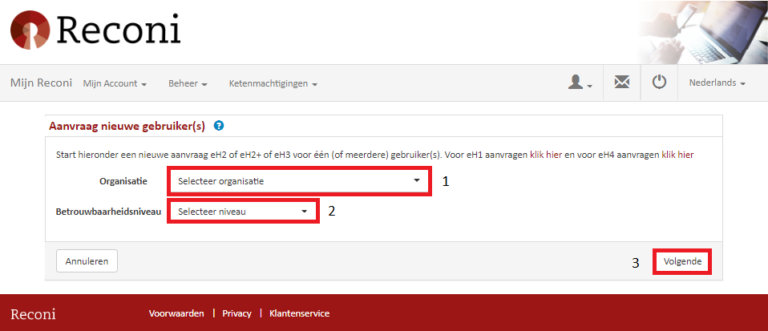
Step 3: Application for new user(s)
Start a new EH2, EH2+ or EH3 application for one or more users.
>Select the organization for which the user should be authorized. >Select the relevant assurance level of the means to be issued . > Click "next."
Step 4: Check the Chamber of Commerce number
> Select whether to restrict the user to a specific branch (Note: some services do not accept branch restriction).
>Click "next."
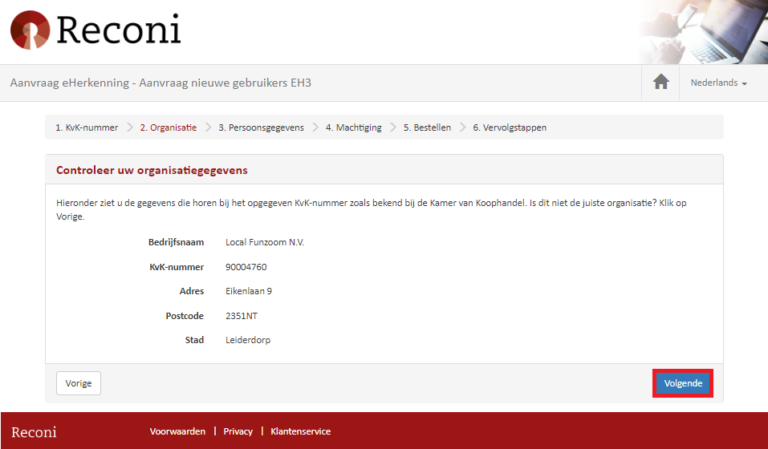
Step 5: Check your organization information
On this screen you will see the data belonging to the specified Chamber of Commerce number as known to the Chamber of Commerce. Is this not the correct organization? Click on "previous."
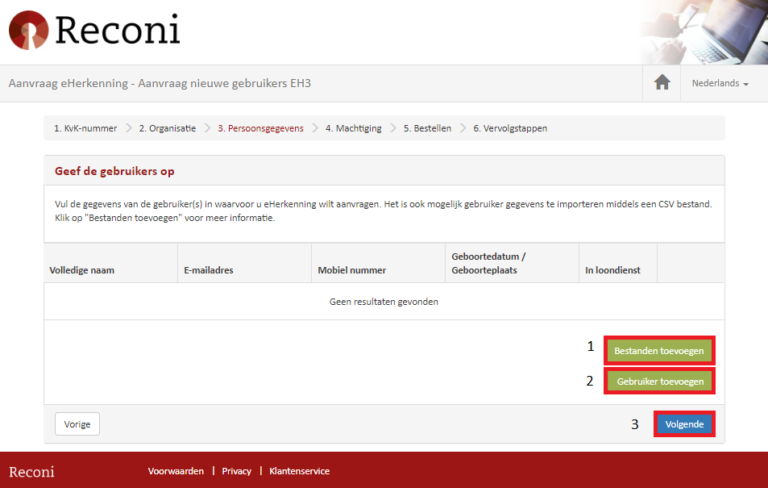
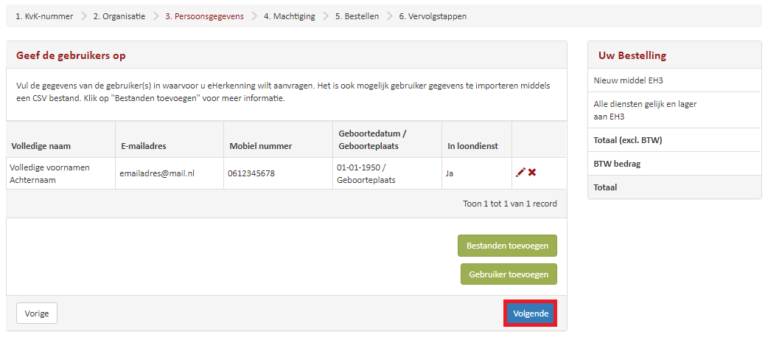
Step 6: Specify the user(s)
> Enter the detailsof the user(s) for which you want to request eHerkenning .Continue to step 11.
> It is also possible to import multiple users simultaneously using a CSV file.Continue to step 7.
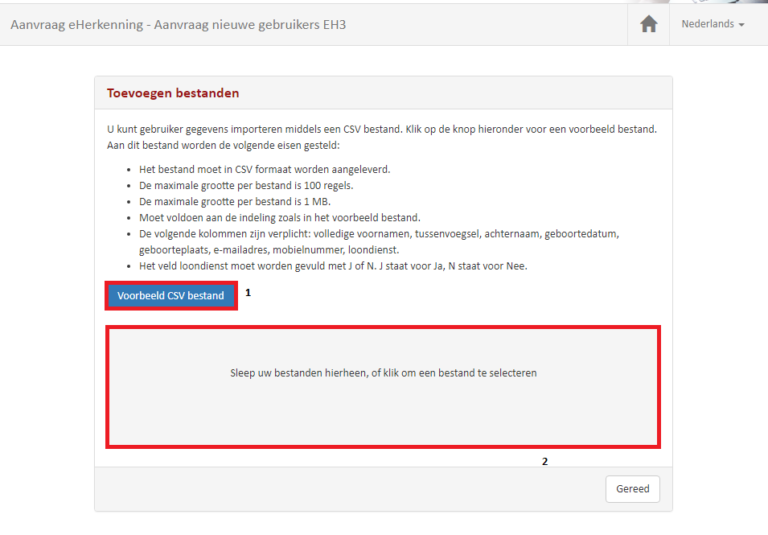
Step 7: Add files
You can import the users' data using a CSV file. To do this, click on the "Sample CSV file" button. The following requirements are imposed on this file:
> The file must be provided in CSV format.
> The maximum size per file is 100 lines.
> The maximum size per file is 1 MB.
> Must conform to the format shown in the sample file.
> The following columns are required: full first name, middle name, last name, date of birth, place of birth, e-mail address, mobile number, payroll.
> The Employment field should be filled with either J or N. J stands for Yes, N stands for No.
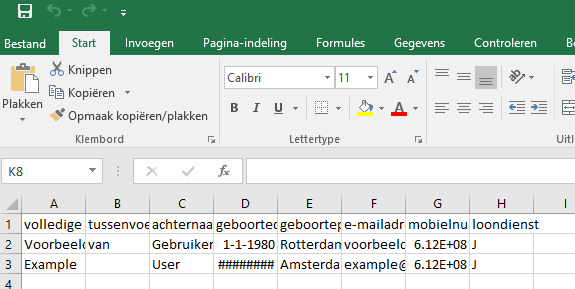
Step 8: Fill in CSV file
Using the "sample CSV file" button, download the Excel template that looks like this.
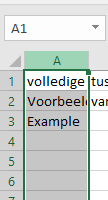
Step 9: Convert data to column view
If the columns are not visible you can click on column "A". Then you can convert the text to column view.
Step 10: Convert Excel to CSV
Next, from Excel's menu bar, click "data" and then "text to columns."
> Click "separate" and then "next." > Click "comma" and then "next." > Click "complete." > Fill in the CSV file. > Save the CSV file as a CSV file.Note:Do not save as an EXCEL file. > Drag and drop the file into the application.
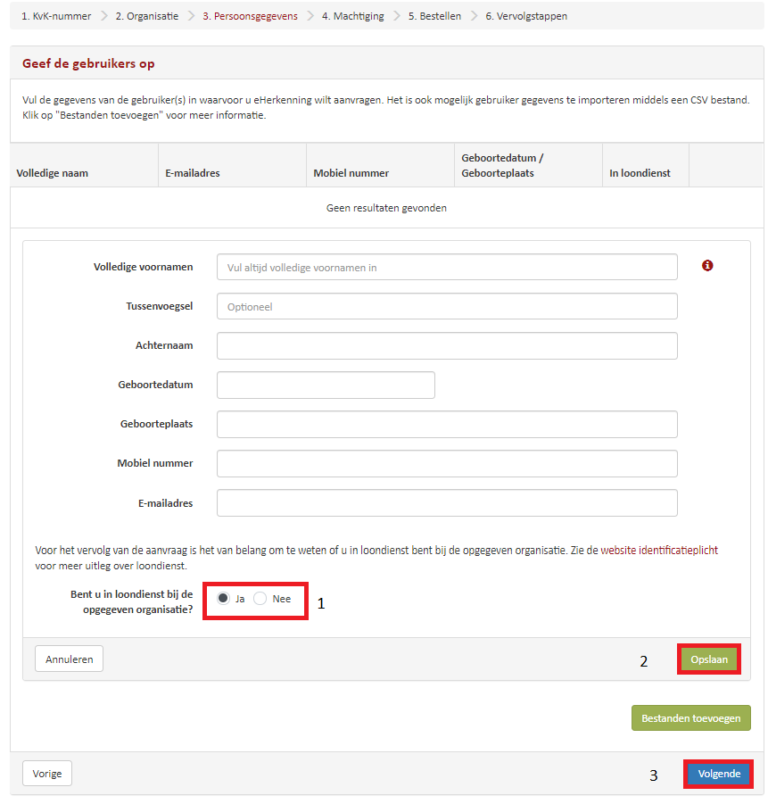
Step 11: Enter users
You can also create users using the "add user" button.
> Enter the data and select whether the user is employed or not. For the remainder of the application, it is important to know if the user is employed by the specified organization. See thewebsite compulsory identificationfor more explanation.
> Click "save" to then add more users:
Step 12: Enter users
When all users have been added, click "next."
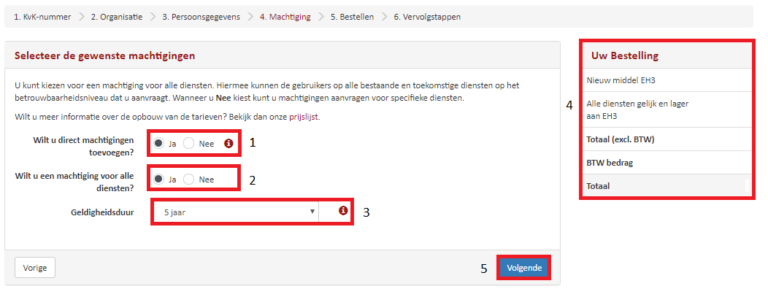
Step 13: Select the desired permissions
At the ''permissions'' step, select the desired permissions to add.
> Do you want to add permissions directly? Select "Yes" or "No." >Do you want an authorization for alle diensten? You can choose an authorization for alle diensten. This will allow users to log in to all existing and future services at the assurance level you are requesting. If you choose "No" you can request authorizations for specific services. > Select the validity period.
Want more information on how rates are structured? Take a look at ourprice list.
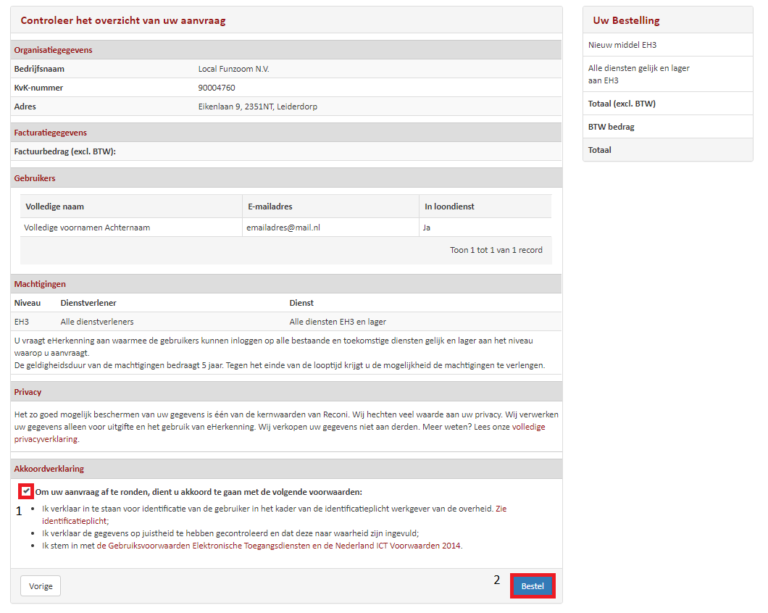
Step 14: Check the summary of your application
> Agree to terms and conditions. > click on "order"
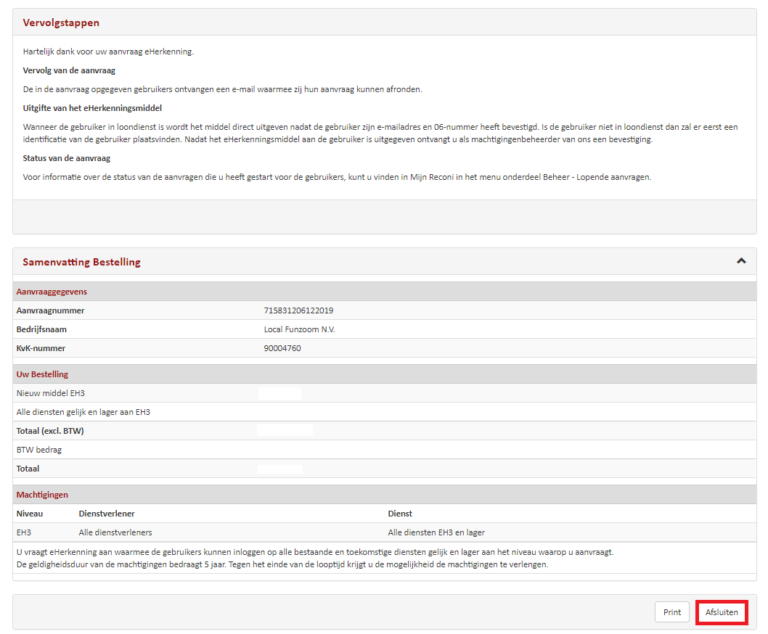
Step 15: Follow-up steps
The users specified in the application will receive an email allowing them to complete their application.
Issue of the eHerkenning If the user is salaried the means will be issued immediately after the user confirms the email address and 06 number. If the user is not sal aried then identification of the user will take place first. After the eHerkenning is issued to the user you will receive a confirmation from us as administrator.
Application status Information about the status of the requests you have started for the user(s) can be found inMy Reconi the "management" > "pendingapplications" menu item.
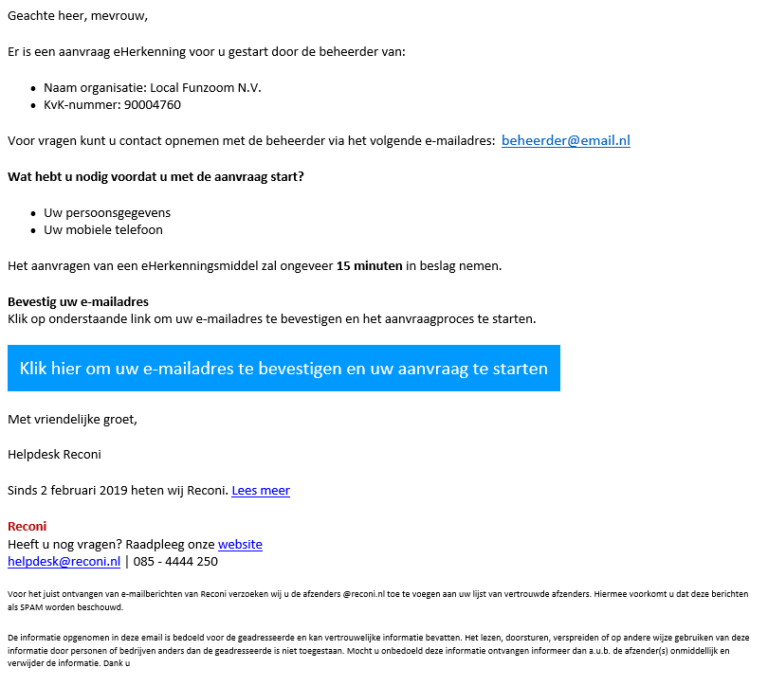
Step 16: Check the summary of your application
The user must confirm the personal data via the email received. This can be done by clicking on the button in the email with: "Click here to confirm your e-mail address and start your application".
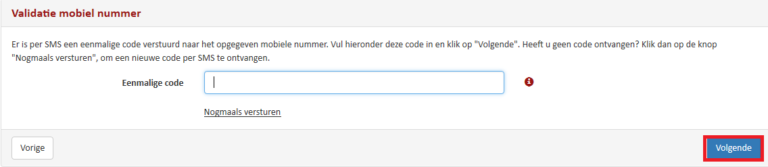
Step 17: Mobile number validation
The user checks the mobile number and clicks "next." The user receives a code by SMS to validate the mobile number.
Step 18: Mobile number validation
On the next screen, the user enters the SMS code and clicks "next."
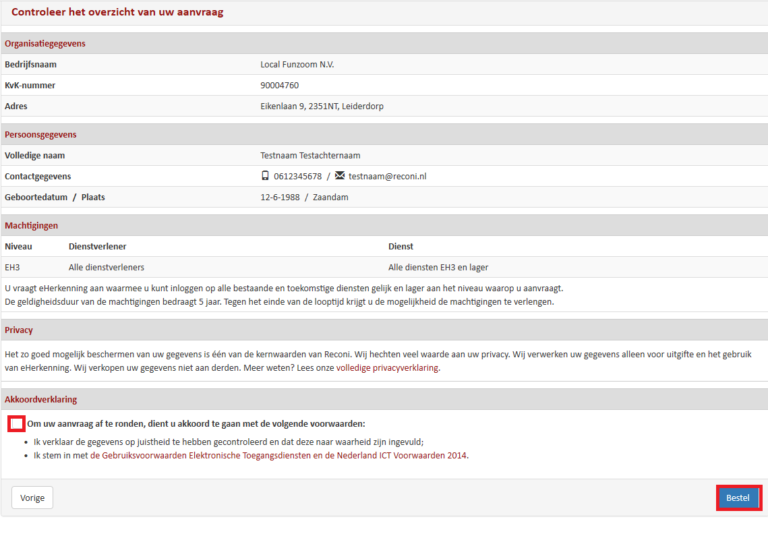
Step 19: Check the summary of your application
The user checks the request and clicks "order."
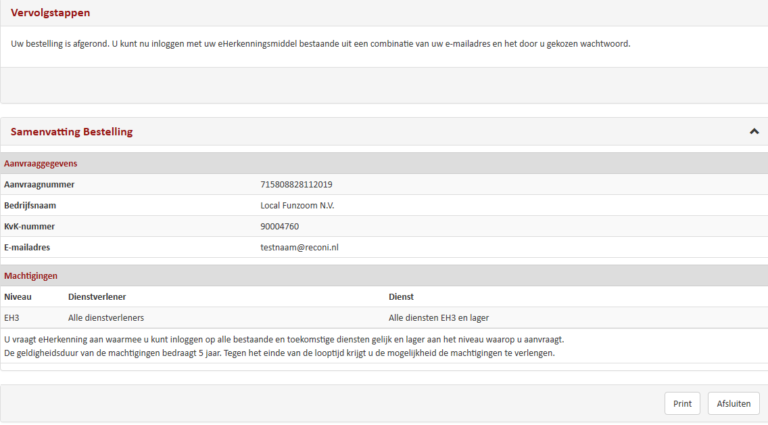
Step 20: Follow-up steps
On the next screen, the user enters the SMS code and clicks "next."